Category Archives: Crafts + DIY

CRAFTOBER: A return to quilting.

When I was home last Christmas, I went through all of my old boxes that had been in the basement for years.  I found in one my first attempt at making a quilt.

This was the product of a long weekend staying at my beloved craft mom’s house. I still remember it so well!  Mrs. Jones was and is an amazing amazing quilter. She took me to a fabric shop and let me design my first quilt–picking out a pattern and fabrics.  The colors were decidedly Laura Ashly inspired but at the time I loved them.

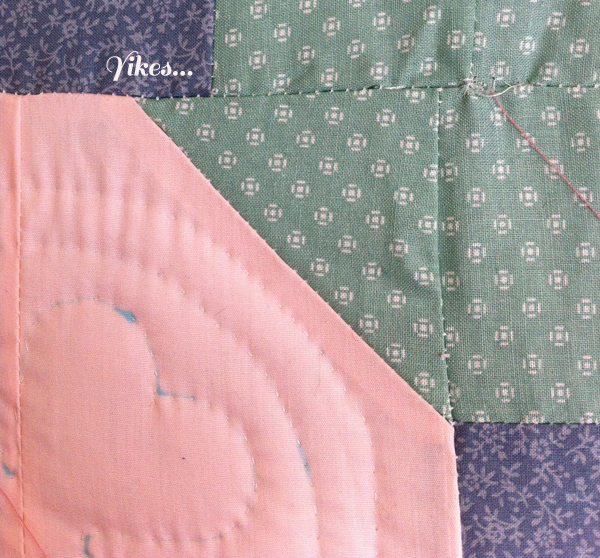
I sped through making that quilt top so quickly. Let’s just say the pieces didn’t necessarily match up perfectly. But it didn’t matter to me.

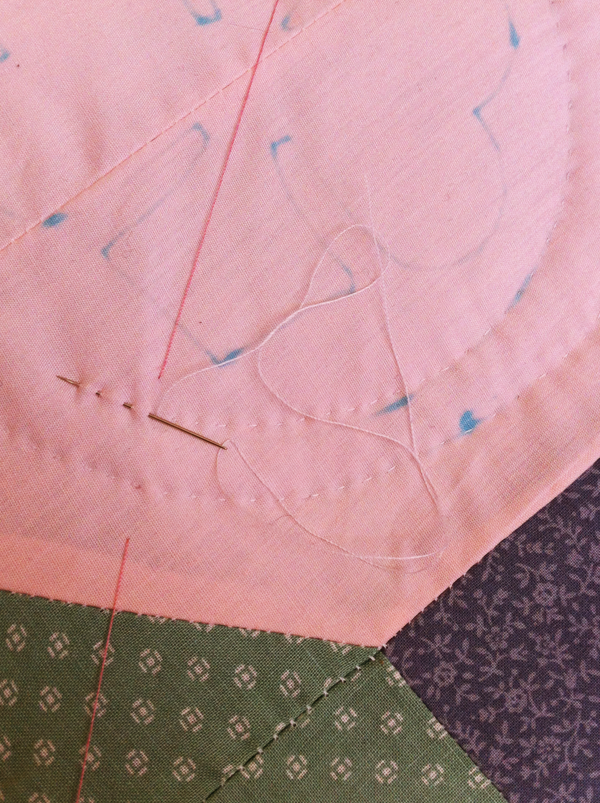
Then I moved cross country and the quilt was packed up, only to be taken out again a few years later after I was cast in the musical, Quilters.  I guess my drama teacher was into method acting because she set up a quilt to hand stitch in the school library. I remember sitting there during many a free period slowly learning to hand quilt.  And I loved it.  It was simply magical to me.

But the musical ended and I was swept up into applying for colleges and being a senior and the little pink, blue and green quilt was boxed up again, to be forgotten until that trip out to Colorado for the holidays.

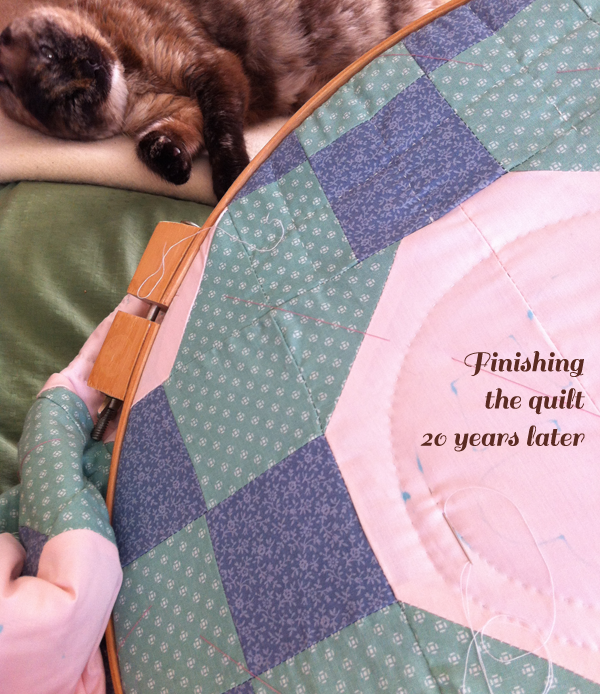
My parents happily sent that quilt out to me and again, it waited. Until a week ago, when I felt the need to to some hand quilting.  Just an hour at night. I’m amazed at how fast I fell into it again.  And with the temps lowering, it is pretty nice to just snuggle under the quilt.

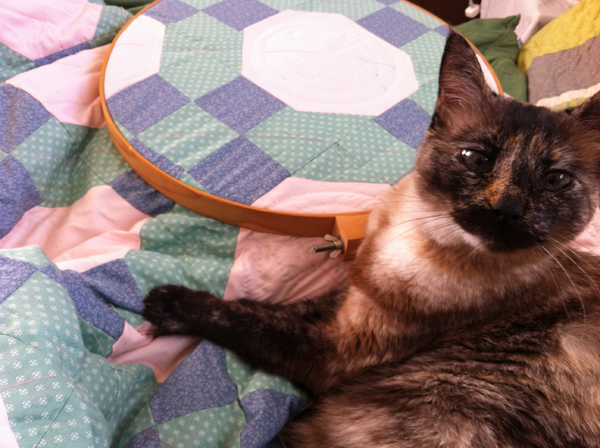
When I pick up the quilting hoop, the Peach will find me and snuggles under it. And the cat just knows. I can’t pull out without that cat finding me and plunking herself right on top of it.

I’m making mistakes, of course and this quilt isn’t the most fabulous colors, but they have grown on me. I do still love them.  And there is just something about this something quilt… I just want to finish it.  Twenty years isn’t too long to take to finish it?  Surely someone has an older UFO hanging around in their craft room? Or not. But I’m really enjoying the process right now and that is half of the battle, right?

I’m taking Craftober very seriously, indeed!

Are you a quilter? Have you ever tried hand quilting?


CRAFTOBER: Swinging Seventies Crafting with McCall’s!

As you know, I love a good vintage craft book! And this one is a holy grail of awesomeness!

Published in 1975, this sweet craft book has the best seventies crafts one could imagine.  And some that really should be brought back–like this wonderful tissue paper lampshade designs.

There are some great pottery ideas–like this wee unicorn!

Am I’m head over heels over these royal little candle holders. Kinda want to make ’em!

But a seventies craft book couldn’t be a seventies craft book without a big chapter on MACRAME!!!

Check out these sweet knotted bits of crafty goodness!

I would die of joy to find this necklace at an estate sale…

Oh, but there are some goodies for the gents in the form of batik ties, natch!

I’d kinda want to get those sweet batik fishies too!

Oh seventies crafts, you are too good to be left in the seventies! When is macrame coming back?  All that is missing is a chapter on latch hook rugs.

Did you ever partake in macrame? Any of these crafts zinging with you?


CRAFTOBER: Toy box cover tutorial

Please tell me I’m not alone here.  I love getting those pretty wooden boxes with lovely toys in them, but I hate that all the toys come spilling out of them.  There has to be a more decent way to deal with this than shoving it in a loose plastic zip lock bag.

What an eyesore, right? So, I decided to make a little fabric cover. A nice pretty cover that wouldn’t look as lame as the  zip lock bag. And it took less than 15 minutes to sew and that’s no too much time to make something pretty.

You may already have the supplies in your craft room. And if not, the Internet can help out on that real quick.

And here is how you do it:

Here is a great tutorial on how to use fold over elastic (FOE) and it is seriously so easy, you’ll officially become addicted…

You could write on the side of the box the name of what is inside it. Or use iron-on letters too! Or ink stamps if you wanted!

It’s the little things, right?

As discussed, this is part of my month-long bonanza of getting my craft groove back!

How’s your crafting going?  What is your next craft inspired note.

Happy CRAFTOBER!!

(Image: the incomparable  Cathy of California)

Hi, crafty folks!  What is it about Fall that just gets me wanting to pull out my knitting needles and dust off my sewing machine?  I don’t think I’m alone in this feeling. So, I’m throwing down the glue gun gauntlet and calling this month CRAFTOBER!  After all, this is a month that demands we all become a little bit crafty, thinking up those sweet Halloween costumes for our little ones, as well as for ourselves.

This month I plan to share with you some of favorite vintage craft books, some original and easy tutorials I’ve been developing, and some great craft inspiration from around the Web every Thursday in October.

I thought I would start Craftober off by sharing with you my first craft book, The McCall’s Golden Do It Yourself book, printed in 1960.  It was a rejected book from my school library sold to me for five cents and I would spend HOURS pouring over these pictures, fascinated with the crafts and the young children dressed so nicely in the photographs.

Here are a few of my favorite crafts from the book.

I loved this flying fish kite!  Look at the concentration on that little boy’s face when he is cutting.  BTW, don’t you love that you can tell the kid actually colored the fish in? So great!

I really think I need to make that elephant!  That might be the cutest thing in the book!

This easy craft would be a great way to get the Peach into drumming.  It uses parchment paper, which I’m not sure is the same parchment paper I’m thinking of. I think it is actually is sheepskin parchment. Don’t know how easy that is to find…

I think I’ll clearly need to eat a lot of ice cream for this toy. No hardship is too much for crafting!

I remember wanting this perky paper doll so badly…  Hmm.. I might need to ruminate on this one a bit to see if I can make something out of it for the Peach…

But some of the crafts were even a bit too crafty for me!  Like this “cat” and hungover queen spool marionettes. Eek!

But out of all the pages in this book, this is one that had the most impact on my as a child.

I learned to knit from this book. OK, I tried to learn to knit from this book.  Honestly, I don’t know if what I created was actually knitting–more like knotting things on two pencils, but man, it started a passion in me and a drive to do more crafting, which was hard as my mother was and is the least crafty person I know. (Although mind you, the most amazing and loving and funny mother a girl could want!)

Do you ever try crafts from old craft books? How did you get into crafting?  Do you have any crafting plans around Halloween?


Easy Peasy Dyeing Vintage Slips Tutorial

I have been collecting vintage slips from estate sales, thrift shops and other misc. places for over a year with the goal of dyeing them pretty Easter egg colors that would add a dashing little bit of color to my normally all black winter wardrobe.  Dyeing them has been on my craft project list for SO LONG. The magical lure of an extra day added to the weekend gave me the perfect excuse and additional time to finally DYE THOSE SLIPS.

Here is what you’ll need to start your dyeing adventure!

  • A non-porous large pot–stainless steel/Teflon/enamel will do
  • Rubber gloves
  • Dye of choice. I prefer liquid Rit dye and feel it is better than the powder and read reviews saying it dyes fabric more evenly than powder
  • Vinegar–this is essential for dyeing synthetic fabrics such as the nylon of vintage slips. If you are dealing with a natural fiber like cotton or silk, you will use SALT instead to help set the dye.

But before you rip open that dye, you must dress the part–like my fashion forward all black look of an old t-shirt and a pair of black sweat pants my mom left me. I’m even wearing good old rubber Crocs in black. Basically you want to wear clothes that you don’t mind getting splashed with color and pretty much ruined.

1.) Fill pot with water–1 gallon and add 1 cup of vinegar.

2.)Add half of the bottle of dye and stir and set water to just simmering.

3.) While waiting for water to simmer, prep your slip by getting it very wet with water.

4.) Let the magic begin and DIP THAT SLIP!

5.) Keep slip in water and stir very often.  Keep heat at a simmer making sure it doesn’t boil over for 30-60 minutes.

6.) After 30-60 minutes take slip out and rinse it under hot water turning down to cold water. This helps set the color. Some color might come out, but that is normal.

7.) After you have rinsed the slip for a good five minutes, squeeze out as much water as you can and hang to dry. As you can see, I got carried away and went on a dyeing tear!

And voila! You have a lovely slip in an equally lovely color! I think they are so jaunty just on their own, but you could add a few rows of contrasting colored lace to fancy it up even more if you wanted.

Remember–all of this glamour does come with a price. Dyed items like these slips are not to be added to your regular laundry or  you could end up with a bit of a mess.   Hand washing only for these sassy slips. But that is how you should treat vintage clothing anyway.

Enjoy and I hope you give it a try. This was surprisingly less fusssy than I thought it would be and took time than I thought it would which was a nice surprise. Plus it was a whole lot of fun too!!!

Have you ever tried dyeing slips? Or anything for that matter?  What was your experience like?